|
To install your new AEC Air Wand, simply follow
the installation steps in order. You will find that after a simple
installation procedure, your new Air Wand will make a lot of your most
distasteful jobs easy and quick to do.
| 1. |
Read all the instructions before trying to implement your
new Air Wand. |
| 2. |
Do not leave the Air Wand operating and un-attended. |
| 3. |
Operation of the Air Wand is not intended for persons under
16 years of age. |
| 4. |
Do not rub the Air Wand on surfaces. Rubbing embeds foreign
matter particles into the surface of the felt. Damage to the
worked-on surface can result if it is rubbed, causing scratches. |
| 5. |
Store in a dry, safe area either by hanging from a hook, or
by storing in a flat, protected area. Care must be given to
ensure that the felt is not resting on anything that may cause
the felt to curl, rip or otherwise suffer damage. |
|
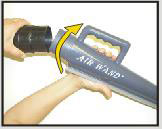
Figure 1. |
1. Affix the nozzle sleeve to the swivel cuff of the hose, in a clockwise direction. Check that the connection is firm.
See Figure 1.
|
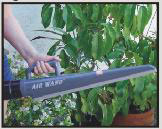
Figure 4. |
4. Keeping a secure hold of the nozzle, start your blower. The air being forced through the nozzle will apply pressure to your grasp. If it is too forceful, shut off your blower. See figure 4.
|
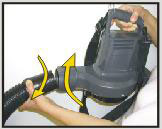
Figure 2. |
2. The hose fitting end fits into the blower discharge assembly as shown in figure 2. Insert the hose fitting into blower discharge and turn clockwise until connection is firmly made.
|
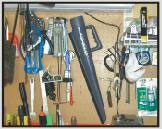
Figure 5. |
5. When the task is complete, shut off blower and store the Air Wand in a safe environment, ensuring that the felt pads are not in pressured contact to any other surface.
See Figure 5.
|

Figure 3. |
3. Place the strap onto your shoulder, resting the blower on your hip. Firmly grasp the AIR WAND nozzle as shown in
Figure 3.
|
|
|
|
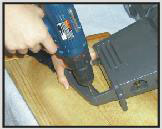
Figure 6. |
1.Using a 1/16 bit, drill two opposing holes into the
blower casing, taking care not to involve any wiring that may be in the handle.
See Figure 6. |
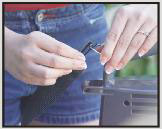
Figure 8. | 3.
Snap each end of the strap to the D ring as shown in Figure 8. |
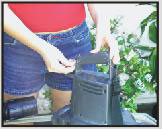
Figure 7. |
2. Insert the D-rings into the drilled holes as shown in Figure 7. Press the D ring
firmly in place. |
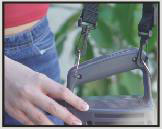
Figure 9. |
4.Assembly will look like the one shown in figure 9 when assembled correctly.
|
|
 * Periodic inspection of felt stripping
will ensure that your AIR WAND will continue to give you the optimum performance
that it was designed to deliver. If with time or use, the felt stripping needs
replacement, you can obtain the replacement strips from A.E.C. Engineering Systems.
* Periodic inspection of felt stripping
will ensure that your AIR WAND will continue to give you the optimum performance
that it was designed to deliver. If with time or use, the felt stripping needs
replacement, you can obtain the replacement strips from A.E.C. Engineering Systems.

Figure 10. |
Removing Old Felt Pads
Grasp the felt pads firmly with either hand. Gently pull felt from the nozzle. Clean residue adhesive from the Air Wand body with alcohol and a soft rag.
See figure 10.
|
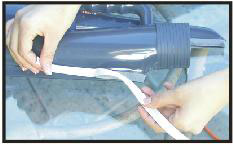
Figure 11. |
Installing New Pads
Peel adhesive backing from the felt strip. Press one end of the felt to the Air Wand casing and gently run finger along the pad, pressing the felt to the nozzle surface.
See figure 11.
|
|

Figure 12. |
1. Insert the end of the flexible hose to the blower fitting.
Secure it firmly, turning the hose counter-clockwise.
See Figure 12.
|
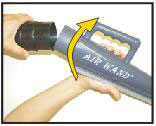
Figure 14. |
3. Connect nozzle male end to female end of swivelcuff. Rotate clockwise to attach. Secure firmly.
|
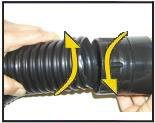
Figure 13. |
2. Insert the other end of the flexible hose to the swivel cuff in a counter-clockwise direction. Check that the connection is firm.
See Figure 13.
|
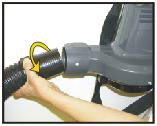
Figure 15. |
4. Connect flex hose assembly, male end, to blower air discharge.
Turn assembly clockwise until firmly secured. See figure 15.
|
|
| Your safety is of paramount concern and A.E.C. Engineering Systems does not assume liability for use of this
product if you are in any way physically impaired and unable to control the air flow.
A.E.C. Engineering Systems is not responsible for injuries sustained while operating the AIR WAND during rainy and wet environment or windy weather conditions. Please use prudence in its operation.
|
|
|